Installing Windows should be easy, right? I mean, I've done it many dozens of times—both during my work as a technician, as well as at home on my various machines. Yet every so often, Windows Boot Manager decides to throw you into a blue-screen hellscape, leaving you chasing ghost partitions for hours instead of getting back to work.
In this post, I'll walk you through the four-hour scavenger hunt I endured when my Windows 11 installation continued failing on my dual-boot setup. You'll see exactly what went wrong, which "fixes" failed, and how I ultimately wrestled the Windows bootloader into submission.
The System: My Configuration
- Host OS: Arch Linux on a 2TB NVMe SSD
- Target OS: Windows 11 on a 1TB SATA SSD
- Firmware Mode: UEFI-only mode with CSM and Secure Boot disabled for troubleshooting.
My First Crash: Blue Screen on Boot
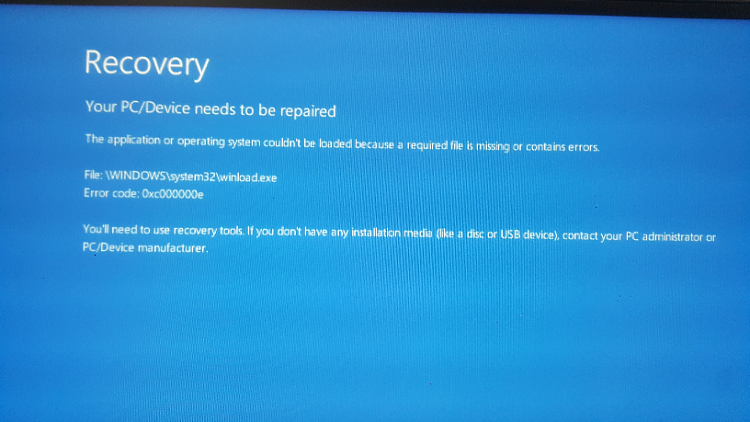
After using Windows to edit images with the Adobe suite, I was asked to apply an update before shutting down—which I did. The following morning, I attempted to reboot into Windows from my GRUB menu, when I encountered this lovely blue screen:
"No worries", I thought. "I'll just use my recovery USB to run bootrec". Little did I know...
Attempts at Resolution
1. Repair With Bootrec
When my Windows installation won't boot, the first tool I grab for is bootrec. For those of you fortunate enough to be unfamiliar with this tool, bootrec is a Windows command-line utility designed to repair issues with the boot process — the kind of issues that pop up when your system says something like "Operating System not found" or "BOOTMGR is missing."
For some background, its basic usage can be broken down into a few simple commands:
bootrec /fixmbr: Writes a new Master Boot Record (MBR) to the system partition created during the Windows installation. Good if your MBR got corrupted (e.g., by malware or a scuffed dual-boot Linux installation).bootrec /fixboot: Writes a fresh boot sector. Handy if the boot sector is damaged or non-standard.bootrec /scanos: Scans for Windows installations that aren't in the BCD (Boot Configuration Data) — useful if your system managed to forget Windows even exists.bootrec /rebuildbcd: Rebuilds the BCD store from scratch. This is useful to add every Windows install it finds back into the boot menu.
So I ran these commands in order:
X:\> bootrec /fixmbr
The operation completed successfully.

X:\> bootrec /fixboot
Access is denied.

X:\> bootrec /scanos
Windows found no installations.

X:\> bootrec /rebuildbcd
0 Windows installations found to add to the boot list.
Despite a successful /fixmbr, the "Access is denied" on /fixboot, along with the parade of "Found 0 installations", told me Windows couldn't see itself. At that point, I'd hit a dead end with bootrec, so I moved onto Plan B: a clean installation.
2. Clean Installation of Windows 11
Next up: a full wipe and reinstallation. I booted into my Windows 11 Recovery USB, pointed the installer at my 1TB SSD, and deleted every partition on the drive in anticipation that the installer would recreate all of the required partitions on the fly. Spoiler: it didn't.
This was where the real adventure began: The Windows Installer failed to create the EFI partition. This spelled trouble because the EFI partition is crucial for booting into Windows.
Without an EFI partition, Windows simply doesn't boot:
- No ESP -> no EFI files
- No ESI files -> no Windows Boot Manager
- No Boot Manager -> error 0xc000000e, rinse and repeat my blue screen.
Naively, I hoped that maybe the partition would be created if I allowed the installation to run on the Primary partition that was created. Instead I got right back to where I started, the same problem as before: Error Code 0xc000000e.
At that point I realized the installer was confused about which drive's ESP it was supposed to use. It wasn't enough to let Windows handle the partitioning on its own. I decided to roll up my sleeves, build the GPT layout (and EFI partition) by hand, and went looking for the missing boot files myself.
3. Manual Partitioning & Deleting the Phantom NVMe BOOTMGR Entry
On my next reboot, I saw something strange in the UEFI boot menu: Windows Boot Manager was listed on my Linux NVMe drive. This explained why the Windows Installer refused to drop the ESP on my 1TB SSD—it thought it had already done its job on the NVMe.
With this discovery in mind, it was time to resolve all these issues:
- Remove the bogus Windows entry from my Linux EFI partition.
- Offline the NVMe drive so Windows can't "helpfully" hijack it again.
- Manually build a proper GPT layout and EFI partition on my SSD.
- Apply the Windows image via DISM.
- Recreate the UEFI boot files with
bcdboot.
A) Destroying Ghost Entry (Windows on Linux Drive)
Finally, I realized Windows thought my Arch EFI was its own—and that it had planted a Microsoft folder right alongside GRUB. It was time to clean house!
- Booting into my Arch NVMe, I mounted my NVMe's EFI partition:
sudo mkdir /mnt/efi
sudo mount /dev/nvme0n1p1 /mnt/efi
- To confirm my suspicions, I took a peek inside
/mnt/efi/EFIto check for the unwanted "Microsoft" directory:
ls /mnt/efi/EFI

<output>
Microsoft # Well, well, well...
Boot
grub
<...>
- Option 1: I decided to permanently delete the Windows boot files using:
sudo rm -r /mnt/efi/EFI/Microsoft
- Option 2: If I wanted to be a bit more cautious, I could have renamed it in case I needed a fallback with:
sudo mv /mnt/efi/EFI/Microsoft /mnt/efi/EFI/Microsoft_backup
- Finally, I had to unmount my drive and reboot:
sudo umount /mnt/efi
reboot
After this, the no-good Windows Boot Manager entry vanished from my UEFI menu. This meant I could continue my efforts, but not before I offlined my NVMe drive so Windows couldn't attempt to re-claim it.
B) Offline the NVMe (From Recovery USB)
- Boot back into my Windows Recovery USB and open the Command Prompt (Shift+F10)
- Use DiskPart to find and offline my NVMe:
diskpart
list disk

# a list of all your drives will appear
# my NVMe was disk 1

select disk 1
offline disk
exit
C) Manual Partition Creation (From Recovery USB)
It was obvious that I couldn't rely on the Windows Installer to create my partition table for me. Here's how I created one myself:
diskpart
list disk

# diskpart will again list all visible drives
# in my case, disk 0 was the target

select disk 0
clean
convert gpt

# 1) EFI System Partition
create partition efi size=100
format fs=fat32 quick
assign letter=S

# 2) Microsoft Reserved (MSR)
create partition msr size=16

# 3) Primary Windows Volume
create partition primary
format fs=ntfs quick
assign letter=W

exit
D) Apply the Windows Image Manually
This was my first time doing a manual DISM apply, but it was simple enough! Basically, I had to point DISM at the Windows image (split .swm files) on the ISO from my USB, and tell it to unpack into my new W: drive:
dism /Apply-Image \
/ImageFile:D:\sources\install.swm \
/SWMFile:D:\sources\install*.swm \
/Index:1 \
/ApplyDir:W:\
Replace D: with the correct USB drive letter
Use /Index:1 for Windows Home or /Index:6 for Windows Pro
If you're not sure whether index 1 is Home or Index 6 is Pro, run:
dism /Get-WimInfo \
/WimFile:D:\sources\install.swm \
/SWMFile:D:\sources\install*.swm
E) Rebuild UEFI Boot Files
With my Windows files now laid down on W:, the final step was wiring up the EFI System Partition so that my firmware could actually boot it:
bcdboot W:\Windows /s S: /f UEFI
After seeing "Boot files created successfully", it was time for the moment of truth.
Success
For the final time, I rebooted my PC, selected Windows Boot Manager from my UEFI menu (now correctly pointing to my SSD), and held my breath until I saw the light at the end of the tunnel:
"Getting ready… Installing features… Almost done!"
Windows 11 was at last finishing its setup dance, and before long, I was staring at the glorious default desktop. After hours of head-scratching, my dual-boot beast was tamed.
Key Takeaways
- Always confirm which ESP you're targeting—Windows has a habit of grabbing the first one it sees.
- When the installer just won't get the job done, manual GPT + DISM +
bcdbootis your friend. - Offline any "distracting" drives to keep Windows in check.
I'm publishing this not only for my own future reference, but in hopes that this walkthrough saves someone else a few major headaches next time the Windows Installer decides it doesn't want to play nice. If you've made it this far, thanks for reading, and I wish you many pain-free OS installations!
-- Z